7 Common Stair Calculation Mistakes & How to Avoid Them
Building a staircase is an exercise in precision. Stair construction demands accuracy right from the first measurement. A single mistake can have a cascading effect on the entire project, leading to a staircase that is uncomfortable, unprofessional, and dangerously unsafe.
The good news is that most costly and common mistakes can be avoided. Understanding the fundamentals of stair design and recognizing common pitfalls will help you approach your project confidently.
This guide will explain the seven most common stair calculation mistakes that contractors and DIY enthusiasts make. It will also provide clear and actionable steps to help you avoid these mistakes, ensuring your staircase is safe, structurally sound, and perfectly built.
Mistake 1: Measuring the Total Rise Incorrectly
In stair construction, the total rise is of paramount importance. It’s the exact vertical distance between the lower finished floor and the upper finished floor. This is the fundamental error that causes all other problems. If your total rise is off, every single step will be affected.
How to Avoid It:
- Measure from Finished Floor to Finished Floor: Do NOT measure from subfloor to subfloor unless you precisely account for the thickness of both the subfloor and the final flooring. It is safer to measure after the final flooring (tiles, hardwoods, carpet) is already in place.

- Use Straight, Rigid Tools: A flimsy measuring tape can sag when used over a long distance. Use a long, straight level held perfectly horizontally and measure down from the top floor, or use a laser level for precision.

- Check Multiple Spots: Do not assume that the floor is perfectly level. Measure the floor in several different locations where the stairs are to be placed and then use the most consistent measurement.

Mistake 2: Creating Uneven Riser Heights
This is a serious safety issue. We have an innate muscle memory when climbing stairs; we subconsciously expect each step to be of the same height. If one riser in a flight of stairs is even ¼ inch taller or lower than the others, it creates a tripping risk. Building codes are very strict and typically allow no more than a ⅜-inch difference between the tallest and shortest riser in a flight.
How to Avoid It: Math is the key. You must divide the total rise equally between all of your steps once you know your exact total rise.
- Divide the total rise by an estimated number of risers (e.g., 7.5 inches) to get an approximate count.
- Round this number to the nearest whole. This is your final number of risers.
- Now, divide your total rise by the final number of risers. This will give you the exact riser height, ensuring perfect consistency. This function is automatically performed by a good stair rise and run calculator.
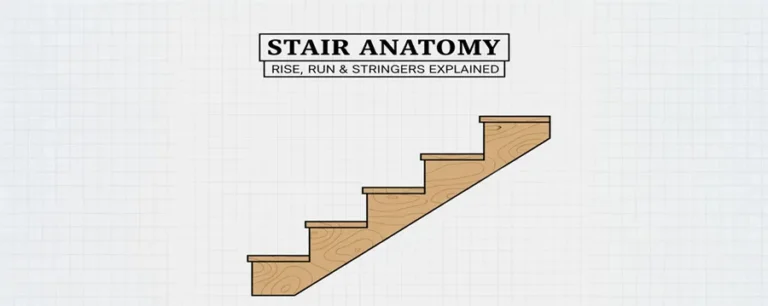
Mistake 3: Miscalculating the Stringer Layout
The stringer is the backbone of the staircase, supporting your treads. Stringer mistakes are very common and can lead to ruining expensive lumber. Most often, people forget to take into account the thickness of the tread material at the bottom.
How to Avoid It:
- “Drop the Stringer”: Once you have marked all the rise and run cuts, you will need to shorten the bottom of the stringer. The amount you cut off the bottom is equal to the thickness of one stair tread. This ensures that once the first tread is installed on top of the stringer, the height of the first step will be the same as the rest.
- Use a Framing Square with Stair Gauges: These brass knobs attach to a framing square and allow you to lock in your rise and run measurements. This ensures that every notch you mark is identical.
Mistake 4: Overlooking Headroom Clearance
It doesn’t matter if you build a mathematically perfect staircase if people have to duck to use it; then it is a failure. Building codes require a certain amount of vertical headroom along the entire length of the staircase. This is measured from the “nosing line” (an imaginary diagonal line drawn along the front edge of all the stairs) to the ceiling or any obstruction above.
How to Avoid It:
- Be Familiar with the Code: In most cases, the standard minimum headroom is six feet eight inches (80 inches). Always confirm this information with your local authority.
- Check During the Design Phase: Use a tape measure to check the vertical clearance in the most constrained area, which is usually where your stairs will pass under a floor joist or beam. You will need to adjust your staircase’s overall run to make it less steep if you do not have enough space.
Mistake 5: Ignoring the Minimum Run/Tread Depth
Builders can neglect the depth of the step’s horizontal run if they focus too much on its rise. Too shallow treads are a major safety risk because they don’t allow for enough room to secure your footing, especially when descending.
How to Avoid It:
- Follow Code Minimums: The majority of residential building codes require that the tread run be at least 10 inches.
- Use Comfort Formulas: To create a comfortable, ideal staircase, rise and run must be in good proportion. A widely accepted guideline is that one rise + one run should equal between 17 and 18 inches. Another is 2 x Rise + Run = 24-25 inches. A stair calculator will help you find the most comfortable and code-compliant combination.
Mistake 6: Using Too Few Stringers
If they are not properly supported, treads can sag and even break. On wider staircases, a common mistake is not using enough stringers. This creates a springy and weak feel at the middle of the stairs.
How to Avoid It:
- Use the 16-Inch Rule: For standard 2x lumber treads, a stringer should be installed approximately every 16 inches on center. This means that for a typical 36-inch wide stairway, you will need at least three stringers (one on each side of the stairway and one in its middle). You will need four or more stringers for wider stairs.
- Consider Thicker Treads: To use fewer stringers, you will need to use thicker tread material (e.g., 5/4 deck boards instead of standard 1-inch boards) that is rated to span a wider distance.
Mistake 7: Failing to Consult Local Building Codes
This is the biggest mistake that can invalidate all your hard work. You might build a beautiful staircase, but if it does not meet local codes, it may have to be demolished. The codes dictate all aspects of a staircase: the maximum rise, minimum run, headroom requirements, stair widths, landing requirements, and handrail specifications.
How to Avoid It:
- Contact Your Local Building Department: Before purchasing any materials, obtain a copy of the residential building code requirements for your specific city or county. You should not rely solely on generic information found online, as codes vary from one location to another.
- Plan for Inspection: Understand the inspection process for your area. You will avoid the headaches and costs of a failed inspection by building everything correctly from the start.
Frequently Asked Questions (FAQs)
1. What is the single biggest mistake when building stairs?
The biggest and most fundamental mistake is getting the total rise measurement wrong. This single measurement dictates every other calculation, and if it’s incorrect, the entire staircase will be flawed and unsafe.
2. Why is my first step taller than the rest?
This is a classic stringer layout error. It happens when you fail to “drop the stringer,” which means forgetting to cut the thickness of one tread from the bottom of the stringer. This makes the first step too high once the tread is installed.
3. How do you fix a stair calculation error after the stringers are cut?
Fixing a cut stringer is difficult and often not recommended for structural integrity. If the error is minor (e.g., the total rise was slightly off), you might be able to shim the stringer at the top or bottom. However, for significant errors, the safest and most professional solution is to start over with new lumber.
4. Is it better to have more steps or taller steps?
It is almost always better to have more steps with a shorter, more comfortable rise. Taller steps (risers) save horizontal space but are steeper, less safe, and often violate building codes, which limit the maximum riser height to around 7.75 inches.
5. Does using a stair calculator prevent all mistakes?
A stair calculator is an incredibly powerful tool that eliminates mathematical errors and helps you visualize the layout. However, it cannot prevent mistakes from incorrect initial measurements. The calculator’s output is only as good as the input you provide, so accurate measurement of your total rise is still essential.
Build with Confidence with our Tool
Building stairs is a project where the old saying, “measure twice, cut once,” is more critical than ever. By understanding these seven common errors, you can sidestep the most frequent problems that arise during stair construction. Take your time with the initial planning, double-check your measurements, and use a reliable stair calculator to verify your math. This careful approach will ensure you build a staircase that is safe, compliant, comfortable, and a source of pride for years to come.